Part 1 — Introduction
This part describes the high-level differences between GPUs and CPUs, and explains how to:
- talk to a GPU from a host program,
- find the device,
- check that what you asked for actually happened,
- to move data across and where that data sits once it is there.
Here, host means your CPU, where the operating system and user programs are running, whereas device means the GPU, a compute accelerator that goes brrrrrr. Everything in this part is host code. It calls a library, and a normal C++ compiler could build all of it. Writing code that runs on the GPU is Part 2; making that code fast starts in Part 3.
1.1 GPUs vs CPUs
CPUs are general-purpose processors designed to minimize latencies: if you click a button in your browser, you want it to react instantly, and you want your CPU to be good at running any kind of program. In contrast, GPUs are specialized processors designed to maximize throughput: When processing large amounts of data, you care less about how quickly the first MB is processed, but more the total time to process the whole dataset.
As a consequence, a lot of CPU die area is dedicated to complicated hardware specifically designed to accelerate one sequence of instructions (or one sequence in each of its cores, which number in the hundreds at most). Some of these dedicated hardware features include branch predictors and register renaming units for speculative execution, as well as cache prefetchers. These measures are required to hide unavoidable latencies, stemming either from executing instructions or from fetching memory.
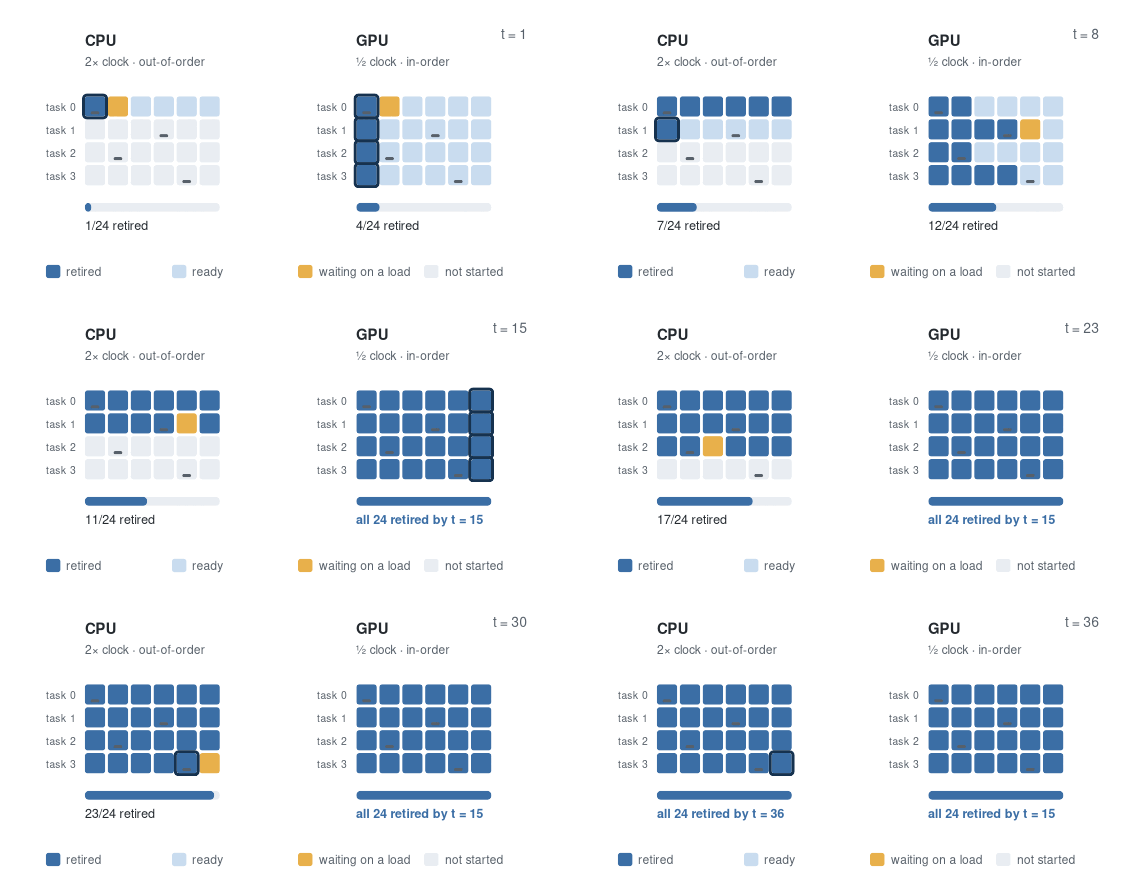
The animation below runs the same workload on a CPU and a GPU: 24 instructions, split into four independent tasks of six instructions each. The tasks don't depend on one another, so they can run in any order. Within each task, one instruction is a slow load from memory, at a different position in each task, and the instruction right after it needs that value, so it has to wait until the load finishes. The catch is the speed each machine works at: the CPU runs instructions twice as fast as the GPU, but the GPU parallelizes all four tasks at once while the CPU takes them one at a time.
Takeaway
We can think of a GPU as many "dumb" CPUs: each one is slower and can't reorder work to dodge a stall, but there are so many of them, all making progress at once, that the total throughput wins.
The figure clearly shows the latency versus throughput trade-off: the CPU, with its higher frequency and its ability to look ahead and execute instructions that are ready even if previous instructions still need to wait for a dependency, finishes task one at t=7. The GPU takes more than twice the time, until t=15, but by then, it has solved all the tasks, whereas the CPU takes until t=36 to be done.
In reality, both CPU and GPU employ many additional tricks and techniques to make program execution faster. We will encounter some of them along this course.
One important consequence of this trade off is worth emphasizing already now: A CPU can be fast because it automatically picks independent instructions ahead in the instruction stream to keep the hardware busy while it waits for dependencies to resolve. A GPU is only fast if there are sufficiently many independent instruction streams to run at the same time. This is your responsibility as the programmer. You need to decompose the program at hand into many parallelizable chunks, or moving the computation to the GPU won't give any benefit. Some problems are inherently more suited to the CPU's style of processing, and most problems will be faster on the GPU only once the problem size has crossed some threshold. Sometimes, a different choice of algorithm is required; even if an algorithm requires twice as many instructions to complete, if it allows you to run 100 times more instructions in parallel, it is the right choice.
1.2 The CUDA runtime
To use the GPU for running computations we need two components. In addition to the actual code to be run on the GPU (which we consider in the next section), we first need a way to exchange data and commands between GPU and CPU.
For NVIDIA GPUs, this is handled by the CUDA Runtime API, or the slightly lower-level CUDA Driver API. As a minimal example, the following program checks for the existence of a GPU and prints a summary of what it is.
int main() {
    int device;
    CUDA_CHECK(cudaGetDevice(&device));

    cudaDeviceProp prop;
    CUDA_CHECK(cudaGetDeviceProperties(&prop, device));

    // The peak bandwidth is not reported directly; it follows from how fast the
    // memory is clocked and how many bits wide the bus to it is. The factor of
    // two is because the memory transfers on both edges of the clock.
    int clock = 0, bus = 0;
    CUDA_CHECK(cudaDeviceGetAttribute(&clock, cudaDevAttrMemoryClockRate, device));
    CUDA_CHECK(cudaDeviceGetAttribute(&bus, cudaDevAttrGlobalMemoryBusWidth, device));

    const double clock_hz = clock * 1000.0;
    const double bytes_per_clk = (bus / 8.0) * 2.0;
    const double peak_bps = clock_hz * bytes_per_clk;

    printf("GPU:   %s\n",        prop.name);
    printf("SMs:   %d\n",        prop.multiProcessorCount);
    printf("DRAM:  %.0f GB\n",   prop.totalGlobalMem / 1e9);
    printf("peak:  %.0f GB/s\n", peak_bps / 1e9);
}
In this example, we print some GPU properties directly, and calculate another one from the available data: The total memory bandwidth available is often crucial to know when trying to judge whether a piece of GPU code is good or bad, and later in the course we report results as the achieved percentage of the maximum. It can be calculated by multiplying the frequency (transfers per second) by the bits transferred per clock cycle (bus width; ×2 because of double data rate), adjusted to the correct units.
Note that we don't have to explicitly initialize the CUDA device; this is handled by the runtime when we call the first CUDA function.
Checking for errors
Almost all CUDA runtime functions return a status code indicating success or an error. As CUDA errors can come from a
variety of sources, many of them outside the control of the person writing the code (e.g., a background update might
have updated CUDA and the driver to a newer version, but the new driver has not been loaded yet). This makes some form
of error checking imperative to avoid unexpected results. The simplest option is to print an informative error message
and terminate. That gives at least some debugging aid, and it prevents the program from executing further and
potentially crashing at a later, unrelated point. CUDA_CHECK above is that, and is the form we will use throughout the
course:
inline void cuda_check_impl(cudaError_t status, const char* statement,
                            const char* file, int line) {
    if (status != cudaSuccess) {
        fprintf(stderr, "CUDA error in %s:%d (%s): %s: %s\n", file, line,
                statement, cudaGetErrorName(status), cudaGetErrorString(status));
        exit(EXIT_FAILURE);
    }
}
#define CUDA_CHECK(statement) cuda_check_impl((statement), #statement, __FILE__, __LINE__)
※ How the error macro works
The macro wraps the call rather than the result, so #statement can name the failing call in the message — "CUDA error
in main.cu:42 (cudaMalloc(&d_x, bytes)): cudaErrorMemoryAllocation: out of memory" tells you what to fix. Note that a
simple assert is generally not a good idea here: you can't wrap your function calls, otherwise they would be elided
away under NDEBUG.
※ Sticky errors
Some CUDA errors are sticky, i.e., once they have been triggered they never go away. For example, after an illegal memory access, the CUDA context is poisoned and every subsequent CUDA function will return the error. With the lower-level driver API, you could construct a new context, but with the runtime API, the only recourse is to restart the program.
Asynchronous errors
Many CUDA calls, and especially the execution of a kernel, are asynchronous. This means that the corresponding function returns before the work is finished on the CPU, so that the CPU is able to do independent operations in the meantime. Consequently, CUDA errors can also occur in the background, to be reported by the next function call, even if that function itself did not fail.
Choosing a device
What happens if you execute this program on a system with multiple GPUs? The CUDA runtime selects one and runs on it. In
principle you could query the number of GPUs with cudaGetDeviceCount and choose one explicitly with cudaSetDevice,
but for applications not intended to use several GPUs at once there is an easier way. The runtime honours the
environment variable CUDA_VISIBLE_DEVICES, so
CUDA_VISIBLE_DEVICES=0 ./program
CUDA_VISIBLE_DEVICES=1 ./program
runs two instances in parallel on different GPUs, even though program was never written with multiple GPUs in mind.
Note that the numbering is the runtime's own: with CUDA_VISIBLE_DEVICES=1, the program sees exactly one GPU and calls
it device 0.
1.3 Moving data
While there are ways in which modern GPUs can share memory directly with the CPU, for now we consider the case where the
GPU memory space is distinct from the CPU memory space. To get data to the GPU, we need to do two things: allocate
memory on the device with cudaMalloc, and then instruct the runtime to copy the data over with cudaMemcpy.
const size_t bytes = n * sizeof(float);

    float* d_x = nullptr;
    CUDA_CHECK(cudaMalloc(&d_x, bytes));
    CUDA_CHECK(cudaMemcpy(d_x, h_x.data(), bytes, cudaMemcpyHostToDevice));

    // ... have the GPU do something with d_x ...

    CUDA_CHECK(cudaMemcpy(h_out.data(), d_x, bytes, cudaMemcpyDeviceToHost));
    CUDA_CHECK(cudaFree(d_x));
The pointer cudaMalloc hands back is a device pointer. It looks like an ordinary address, and nothing in the type
system stops you from dereferencing it in host code. But it addresses the GPU's memory, so doing so is a segmentation
fault at best. Often, people keep a naming convention like the d_/h_ prefixes above as a cheap way to avoid the
mistake.
Why does cudaMalloc take a void** and write through it, rather than returning the pointer the way malloc does?
✦ Solution
Because the return value is already spoken for: every runtime call returns a cudaError_t so that failures can be
checked uniformly. Anything the function needs to hand back is written through an out-parameter instead.
1.4 The memory hierarchy
Almost everything that makes a GPU program fast is a question of where its data is, rather than of what arithmetic it does. The probably best-known illustration is FlashAttention. The arithmetic is identical — the paper's title insists on exact attention — and it in fact performs more floating-point operations than the implementation it replaces, recomputing intermediates instead of keeping them. Its advantage is in avoiding transferring data between the GPU's cores and its main memory, a slow process compared to the speed of the cores themselves. To understand why a technique like that is helpful, we need to understand the different levels of memory the GPU offers. For a B200, they look like this:
In this figure, we see the following things: To the left, we have the streaming multiprocessors (SM), which are similar to a core in a CPU. Each SM has three types of memory your data can sit in: registers, shared memory, and L1 cache. Registers are by far the fastest type of memory, but they are very restrictive in how they can be accessed. Shared memory and L1 cache share the same underlying physical memory, which is much more flexible than registers, but slower to access. The two modes provide different trade-offs in speed and convenience; shared memory can be faster but requires manual management (all of Part 5), whereas L1 cache is engaged automatically to prevent having to reload data from the much slower tiers of the memory hierarchy.
The fourth block in each SM, tensor memory, is not general-purpose storage and is drawn here only so that the SM is not misrepresented: it holds operands for the tensor cores, the units that do matrix arithmetic, and is filled from shared memory rather than by any load your code writes. It is new in Blackwell, and nothing before the tensor-core material has any use for it.
To the right of the SMs, we have the L2 cache3. L2 cache is shared among all SMs and is slower than shared memory and L1 cache, but it provides a much larger capacity. Like the L1 cache, it is used automatically. Finally, there is DRAM2, which adds another factor of 1000 in size. However, DRAM is physically outside the main GPU chip (off chip), and uses a different, slower, memory technology.
※ SRAM vs DRAM
Caches and registers are built from SRAM (static RAM), whereas DRAM (dynamic RAM) is used for off-chip device memory. SRAM uses (typically) six transistors to store a single bit of data. In contrast, DRAM uses one capacitor, as well as one transistor to regulate access to the bit. As capacitors lose their charge over time, DRAM requires periodic refreshing to maintain data integrity, hence the name dynamic RAM.
These physical differences mean that DRAM needs much less space per stored bit, and is therefore cheaper to manufacture in large quantities. But because reading data means draining the capacitor to determine its state, it is also much slower. If you are interested in more details, you may find this video useful.
※ DRAM, HBM and GDDR
Papers routinely say a tensor lives "in HBM" where what they mean is the GPU's off-chip device memory. HBM (High Bandwidth Memory) is not a different kind of memory — it is DRAM, packaged differently. The dies are stacked on top of one another and placed on the same package as the GPU die, where an extremely wide bus (thousands of bits) can run at a fairly modest clock.
The alternative packaging is GDDR, where separate chips sit on the board around the GPU and reach the same bandwidth with far fewer wires driven much faster. Consumer cards use GDDR; datacentre cards currently use HBM.
Of course, the GPU does not exist on its own, but is connected to a host system over a PCI Express bus1. Here we lose two orders of magnitude in speed again, and in current configurations often do not gain that much additional memory (even though a server might have 2TiB of RAM, that would go together with 8 GPUs, leaving only 256GiB per GPU).
Pinned memory
There is an additional complication: For "normal" memory, the host operating system might at any moment swap a page out, that is, to write its contents to disk so it no longer consumes precious RAM. This would be catastrophic for GPU communications, though, as data sent to or read from a specific target might end up touching entirely unrelated memory. Therefore, the GPU only communicates with pinned memory. Pinned memory tells the operating system that it may not be swapped out.
When running cudaMemcpy from an ordinary host allocation, the CUDA driver first copies data into a pinned staging
buffer, and only in a second step to the GPU. This can be inefficient. You can skip that step by allocating pinned
(page-locked) host memory yourself with cudaMallocHost, which typically buys a substantial increase in transfer
bandwidth. However, if a large fraction of system memory is pinned, you severely restrict the OS's ability to address
memory pressure by swapping.
AdvancedUnified addressing
Claiming that GPU and CPU memory live in different address spaces is a simplification. On modern GPUs, it is possible to use unified addressing, which means that the both device and host pointers live in the same 64-bit address space. In that case, the device can, for example, directly access data in pinned memory (see above). On Grace-Hopper/Blackwell systems, this also works in the other direction, the CPU can read GPU memory directly.
Another strategy is employed by unified memory. In this case, memory does not get allocated to a specific device or the host. Instead, the virtual memory subsystem migrates data at the page granularity to wherever it is currently being accessed from. This means that it is possible to allocate more unified memory than the GPU has available memory, at the cost of increased data movement, similar to swap space for host-side RAM.
Taken together, these levels form what is called the memory hierarchy. The levels are ordered by their distance from the cores. Each step outward holds more, costs less per byte, and takes longer to reach. There is no level that is both large and fast — if there were, none of the others would need to exist. Data becomes usable by moving inward along that order, whether the hardware pulled it into a cache on its own or your code put it where it wanted it.
All of this is an overview, though: each level gets taken apart where it earns the space. How threads are grouped, and so which of them can see which level, is Part 2; what a global memory access really costs, and why the access pattern matters just as much as the volume, is Part 3; shared memory and its banks are Part 5.
1.5 The toolchain
In order to use any of the CUDA functions introduced above, they need to be made available by linking with the CUDA
runtime. When compiling with a regular C compiler, this is achieved by adding -lcudart; when using nvcc, the CUDA
compiler, this happens automatically.
The runtime uses the driver to talk to the hardware: a kernel module, plus a user-space library (libcuda.so) that
exposes the low-level driver API. It comes with the GPU driver package4, not with CUDA, and it is what
actually submits work to the device. You can have multiple versions of the runtime simultaneously, but only one driver
can be active at a time. The rule between them is one-directional: a newer driver will run binaries built against an
older toolkit, but a toolkit newer than the driver generally will not work.
The CUDA toolkit is the full suite of headers, libraries, and tools that you use to build CUDA programs. It includes
nvcc, the CUDA compiler, as well as utilities for profiling and testing. Furthermore, it comes with a set of libraries
implementing common GPU operations like matrix multiplication (cuBLAS), Fourier transforms (cuFFT), random number
generation (cuRAND), and many more.
To check the versions of the driver and toolkit, you can use the nvidia-smi and nvcc --version commands,
respectively.
With the full toolkit installed, building the example we had earlier is as simple as:
nvcc device-query.cu -o device-query
1.6 Recap
Host and device. The host is your CPU; the device is the GPU, used as an accelerator for the parts of a program that have enough parallelism to be worth moving. Everything in this part was host code — it called into a library, and never ran anything on the GPU itself.
Error checking. CUDA returns cudaError_t from essentially every function. Comprehensive error checking is
essential to prevent nasty head-scratchers later.
Device memory is a separate address space. cudaMalloc returns a pointer the host must not dereference,
cudaMemcpy moves data across in either direction, cudaFree releases it. A transfer from ordinary pageable memory is
copied through a staging buffer first; cudaMallocHost skips that hop, at the price of memory the operating system can
no longer move.
RAM is the outermost level of a hierarchy running registers → shared memory and L1 → L2 → DRAM → host RAM, ordered by distance from the cores, with every step outward larger, cheaper per byte and slower to reach.
1.7 Exercise — Copying a rectangle
Copy a rectangle out of a host matrix onto the device.
Interface
float* upload_roi(const float* h_src, int src_w, int src_h,
                  int roi_x, int roi_y, int roi_w, int roi_h);
h_src is a host matrix of src_h rows by src_w columns, row-major, so element (r, c) is
at h_src[r * src_w + c]. Return a pointer to device memory holding the roi_w × roi_h
rectangle whose top-left corner is (roi_x, roi_y), packed — its rows roi_w floats apart — so
that
returned[r * roi_w + c] == h_src[(roi_y + r) * src_w + (roi_x + c)]
Hints
※ API Reference
This exercise can be solved elegantly by a runtime function not mentioned in the notes. Go to the Runtime API reference and look through the memory management section.
-
Grace-Hopper and Grace-Blackwell systems replace PCIe with a cache-coherent NVLink interconnect, several times faster. ↩
-
When talking about GPUs in their role as graphics cards, often also called VRAM, or video RAM. ↩
-
Drawn as one cache, but it is split into two halves. ↩
-
Often, CUDA is provided as a meta-package that installs the driver, runtime, and toolkit together. ↩